
By Charly D. Miller, Paramedic
EMS Author & Educator, Consultant
Restraint Asphyxia Expert Witness
Updated August, 2002
New Update Coming ... October, 2004?
In Part One we learned how forcefully restraining a patient in the prone position (or use of prone-hobble-restraint) seriously interferes with normal breathing, and can cause death by Restraint Asphyxia.
Part Two discussed how Patient Activities and Behaviors – preceding restraint –
additionally contribute to restraint asphyxia.
In Part Three we will explore a SAFE, Supine Method for Total-Body-Restraint that is easily employed, and equally as immobilizing as, forceful-prone-restraint or prone-hobble-restraint – yet allows full access to the patient without the threat of death by restraint asphyxia.

Clearly, the use of forceful-prone-restraint or prone-hobble-restraint poses an unacceptable risk of death from restraint asphyxia. Clearly, the use of any form of PRONE restraint interferes with care providers' access to the patient for accomplishing a complete and thorough examination – interferes with performance of ALL required emergency care procedures. Clearly, the use of forceful-prone-restraint violates the emergency medicine Prime Directive, to "Do No Harm!"
Thus, such practices must immediately be banned from ALL emergency responders' protocols of operation.
When dramatically changing any previously-accepted operational technique from use – when implementing a "change" in providers' long-time behaviors or practices – it is IMPERATIVE that providers be EDUCATED as to WHY the change must occur. [Parts 1 and 2 of this article!] Then, it is IMPERATIVE to simultaneously implement an equally-effective alternative to the banned / changed technique.
What follows is an in-depth description of the steps required to safely transfer a forcefully-prone-restrained or prone-hobble-restrained individual to a supine position; and the steps for application of a total-body-restraint technique that is actually even MORE immobilizing than the use of forceful-prone-restraint or prone-hobble-restraint. This technique of total-body-restraint accomplishes the needs of MEDICAL restraint (allowing care providers full access to the patient for performing a complete examination, and affording unimpeded performance of all emergency care procedure required) – yet does not threaten the patient's life (or the providers' livelihood).
SUPINE TOTAL-BODY-RESTRAINT
|
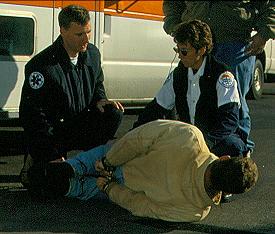 Photo © 1997 Howard M. Paul |
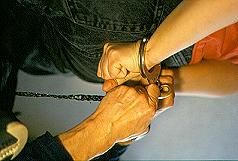 Photo © 1997 Howard M. Paul |
and in hobble restraints, remove the hobble (the tie that binds the wrists to the ankles) and the handcuffs, and assess for respiratory or cardiopulmonary arrest.
If Rescue Breathing is indicated, implement it (!) |
The following steps outline the manner that the patient should be supinely restrained to a long back board. However, from here on, we will assume that the restrained patient was NOT unconscious upon your arrival.
(2B) If the side-positioned, restrained patient is CONSCIOUS (still combative, OR NOT),
mechanical restraints (handcuffs, ankle shackles – even hobble restraint)
may REMAIN IN PLACE as long as the patient is maintained on his SIDE!
(3) Keep the restrained, conscious, patient on his side until a "sufficient number of people" are available to control the patient during alternative restraint replacement.
At least FIVE PEOPLE are required to accomplish the safe transfer of significantly violent individuals from law enforcement restraint to MEDICAL restraint: one person to control each limb/major joint, and one person to apply alternative restraints.Additionally, someone needs to be identified as the "Team Leader." The Team Leader is the person "calling the shots," and should be the person who knows how to safely accomplish the restraint transfer! ("Team Leader" assignment should NEVER be based upon "rank!")
All assisting persons need to know what their "assigned limbs" are – and what the "plan" is – before any action is actually implemented.
(4A) Bring a LONG BACK BOARD to the Side of the Patient!
This is important for several reasons.
FIRST: Most individuals requiring total-body-restraint have an altered level of consciousness, AND have incurred SOME kind of trauma during one or more of the exertional Phases preceding application of total-body-restraint. (If not during Phase 1, then during all the chase-&-tackle stuff of Phase 2!) Thus, ALL individuals requiring total-body-restraint
SHOULD be SPINALLY IMMOBILIZED!SECOND: Use of a long back board will afford immediate and continuous SUPINE total-body-restraint, in addition to making it much SAFER to TRANSFER the patient to the NEXT LEVEL of CARE PROVIDER!
If the first-responding care providers are not the transporting care providers, having the patient supinely-restrained to a long back board (LBB) means that the patient can remain restrained to the LBB – can be lifted to the transporting care providers' wheeled stretcher without having to alter (untie!) ANY of the restraints!
When the next level of care provider is the emergency department staff, having the patient supinely-restrained to a LBB means that the patient can remain restrained to the LBB – can be lifted to the ED bed without having to alter (untie!) ANY of the restraints!
Concern about pressure sores caused by extended periods of time restrained to a LBB, or LBB-related patient discomfort increasing agitation(22) is entirely negated by the fact that: Once in the ED, the patient can be chemically sedated (discontinuing agitation), and (if cleared by X-ray) can be removed from the LBB prior to pressure sores becoming an issue!
(4B) Put the law-enforcement-restrained patient on the Long Back Board, ON HIS SIDE, and prepare to transfer him to LBB restraint. Position all responders around the patient and LBB to ensure optimal control of the individual when law enforcement restraints are gradually removed.
Remove all "posterior" restraint (handcuffs and/or hobble ties), while maintaining physical control of the patient's wrists/arms, shoulders/hips, and place the patient SUPINE on the LBB.
Once SUPINE, the persons in charge of controlling each ARM should also place controlling-weight upon that arm's anterior SHOULDER – but, without placing weight upon the individual's chest.Once SUPINE, the persons in charge of controlling each LEG should be placing controlling-weight upon the HIP and thigh of their assigned leg – NOT fussing with the individuals knees or ankles!
[If you control the hip and thigh of a supinely-restrained individual, the corresponding knee and ankle can't "go" anywhere, or "do" anything!
Fussing with knees and/or ankles only leads to "strength contests" between the patient and the restrainers – strength contests that will certainly aggravate the restrainers ... strength contests that the restrainers will likely "loose!"]
(5) Restrain the Supine Pt's Chest to the LBB with a Restraint Strap:
Persons in charge of controlling each arm should extend ONE arm/wrist UP (above the patient's head), and ONE arm/wrist DOWN (by the patient's thigh). This "split" arm placement technique physiologically interferes with the patient's ability to use his strong abdominal muscles to assist his struggles against restraint. Additionally, this arm positioning technique most effectively holds the patient's chest in place for Chest Restraint placement.
About "Restraint Straps":
I prefer using double-folded lengths of STRONG, roller gauze (SIX-ply Kerlix® or Kling®) for ALL restraint straps. When doubled and appropriately anchored, SIX-ply roller gauze is strong enough to hold even PCP-OD's! No "decontamination" is required of such restraints (they are disposable). And, if the patient seizes (requiring rapid removal of ALL restraint) ... out come the trauma shears!
To avoid chest-expansion-interference – yet still be an EFFECTIVE restraint – a Chest Restraint strap must be bilaterally-anchored to the LBB just above the axillary (armpit) area on either side of the patient.
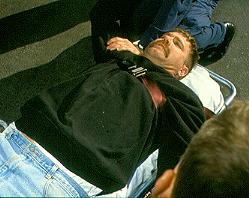 Photo © 1997 Howard M. Paul |
Restraint Straps placed OVER one or both of the arms are BAD restraints. The patient will be able to "squirm" one or both of his shoulders down and under the restraint strap. Such chest strap positioning is entirely ineffective, and a terrific waste of time and effort.LOOSE or Low-Anchored Chest Restraints tend to slide DOWN onto the chest, as the patient continues to struggle. As they begin to slide around, such inappropriately placed/anchored straps inevitably get snugged-up in a LOWER-chest position (ACROSS the chest), and can become a serious impedance to chest expansion.
NEVER Engage an "Abdominal" Restraint! Even after the LBB-supinely-restrained individual is placed on an ambulance wheeled stretcher, do NOT employ an ABDOMINAL belt to keep the total-body-restrained individual on the stretcher. To do so, is to risk serious breathing interference.
(6) Restrain the Supine individual's Lower BODY to the LBB:
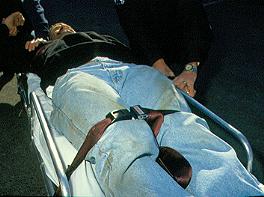 Photo © 1997 Howard M. Paul |
the patient can easily flex and rotate one or more of his legs, and escape the Lower Body restraint. Plz don't do that! |
This Lower Body restraint anchoring and placement technique will entirely defeat ALL attempts on the part of ALMOST ALL patients to "free" their legs from restraint. Most patients need no more than this Lower Body Restraint strap to keep them from injuring themselves or others.
(7) SECURE the Patient's ARMS to the LBB:
Tie the center of a double-folded length of STRONG, roller gauze (SIX-ply Kerlix® or Kling®), around EACH of the patient's wrists. Double-knot it at the BACK of the wrist, so that a "FULL KNOT" is accomplished. This keeps the restraint "cuff" from becoming tighter, or looser, around the patient's wrist.
By knotting the "cuff" at the BACK of the patient's wrist, once anchored to the LBB, the anterior AC (inner elbow) surface ends up being better available for B/P measurement and IV procedures!
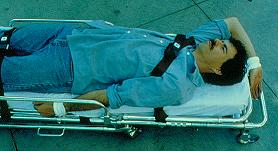 Photo © 1994 Michal Heron |
[The "dominant-" vs. "non-dominant-" limb placement factor is not "VITAL!" Obviously, you probably won't know when the patient is Left-Handed. The above directives simply describe the "preferred" (and most effective) means of selecting which wrist to restrain UP, and which to restrain DOWN – especially considering the most usual position of the care provider (at the supine patient's LEFT SIDE) when enroute to the ED. The only, truly, important factor is that ONE wrist is restrained UP, and ONE wrist is restrained DOWN.]
REMEMBER: by restraining ONE arm above the patient's head and the OTHER at his side, you effectively disable the patient's ability to use his strong abdominal muscles to assist in attempts to defeat restraint.And, by accurately ANCHORING restraints, you effectively disable the patient's ability to move his wrists up-&-down, or side-to-side. Thus, he is entirely, "medically," immobilized – he cannot interfere with complete assessment, blood pressure measurement, IV access, treatment provision, etc...
(8) Evaluate the Need for Ankle Restraints:
Often, the combination of appropriately placed and anchored chest-restraint-strap and lower-body-restraint-strap (and bilateral wrist-restraints) is sufficient to provide Total-Body-Restraint. However, if the patient is "DIVINELY INSPIRED" to defeat or escape from restraint (continues to extremely struggle against the Lower Body restraint), EMPLOY ANKLE RESTRAINTS.
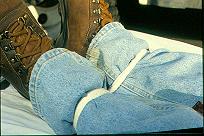 Photo © 1997 Howard M. Paul |
 Photo © 1994 Michal Heron |
Supine Position, and in a manner that is even more immobilizing than forceful-prone-restraint or prone-hobble-restraint.
Yet, he is also restrained in a manner that allows for |
Law Enforcement Options:
Unfortunately, law enforcement officers usually do not have a LBB to attach seriously-combative patients to.
No matter what total-body-restraint methods are used by law enforcement officers, it is VITAL that they be educated about the causes of Restraint Asphyxia. Additionally, it must be emphatically stressed that suspects cannot remain restrained – in any way – on their stomachs, for ANY length of time!
SUMMARY Of Steps For Total-Body-Restraint To A LBB:
(1) If they are on their stomach, get them OFF IT! IMMEDIATELY!
(2A) Assess for level of consciousness and respiratory or cardiac arrest.
Get them OUT of everything if they are unconscious.
Then, while you provide resuscitation, restrain them supinely to a LBB.
(2B) If they are conscious, leave them in the restraints – but KEEP them on their SIDE – until you and your TEAM are ready to transfer them to Supine LBB Restraint.
(3) Gather your TEAM of 5, identify the Team Leader, and discuss your PLAN for restraint transfer.
(4) Get them on a LBB, on their side, and position everyone for maximum control during restraint transfer. Remove all posterior restraints, and physically restrain them SUPINE on the LBB.
(5) Secure the Chest Restraint Strap.
(6) Secure the Lower Body Restraint Strap.
(7) Secure one arm UP, and one arm DOWN.
(8) Consider the need for Ankle Restraint; tying the ankles TOGETHER first, if ankle restraint is needed.
Use of forceful-prone-restraint or prone-hobble-restraint has clearly been shown to contribute to rapid (irretrievable) death from restraint asphyxia. Medical care providers have no reason, excuse, or support for continuing to use such restraint techniques.
Appropriately anchored and engaged restraint straps can effectively restrain a SUPINE individual to a long back board, without compromising the individual's ability to breathe.
This alternative system of supine total-body-restraint provides restraint that is even MORE "immobilizing" than forceful-prone-restraint or hobble restraint – yet, allows medical care providers full access for patient examination, evaluation, and unimpeded provision of required medical care procedures.
Lastly, supine total-body-restraint prevents patient death from restraint asphyxia (and prevents provider-litigation for "wrongful death")!
About the Author: Charly is an internationally-known emergency care author, EMS Instructor, Consultant, and Restraint Asphyxia Expert Witness.
A paramedic since 1985 (nine years as a "Denver General" Paramedic), Charly is a seasoned prehospital emergency care provider. With her additional experience as a psychiatric medical technician and an Army National Guard helicopter medic, Charly is one of the country's most exciting and entertaining EMS educators.

 Email Charly at: c-d-miller@neb.rr.com